


はじめに
最近流行りのPythonパッケージ管理方法のPoetryを使ってみようと思います。
Poetryは、パッケージをインストールすると自動でrequirements.txt的なものを書き換えてくれるようです。これがかなりいいなと思っていましたので、Poetryで環境構築してみます。(先輩も使ってて知りたかったのもあります)
Poetryとは
Poetry は、 Python で依存関係を管理およびパッケージ化するためのツールです。これを使用すると、プロジェクトが依存するライブラリを宣言でき、ライブラリが管理 (インストール/更新) されます。Poetry は、繰り返しインストールを確実にするためのロックファイルを提供し、配布用にプロジェクトを構築できます。
https://python-poetry.org/docs/
では、実際に環境構築を進めていきましょう。
環境構築
前提
下記を前提として進めていきます。特に会社のPCで行う場合、PowerShellのProxyの設定等はエラーの原因として多いと思うので、必要かもしれません。(こことかが参考になるかもしれません)
- Windows PowerShellが使えること
- Proxy等の設定が通っていること
※今回の確認環境
- Windows 11 Home
- Windows PowerShell 7.4.0
- pyenv 3.1.1
- Poetry (version 1.7.0)
pyenv-winのインストール
もし、pipからの移行でpyenv-winが入っていれば、この節はスキップしてください。
入ってない方は、ここを見ながら進めましょう。(https://github.com/pyenv-win/pyenv-win/blob/master/docs/installation.md#powershell)
今回は、Windows PowerShellでインストールします。
Windows PowerShellで、以下のコマンドを入力します。pyenv-winをインストールするコマンドです。
PS C:\WINDOWS\system32> Invoke-WebRequest -UseBasicParsing -Uri "https://raw.githubusercontent.com/pyenv-win/pyenv-win/master/pyenv-win/install-pyenv-win.ps1" -OutFile "./install-pyenv-win.ps1"; &"./install-pyenv-win.ps1"しかし、以下のエラーが出ると思うので、管理者権限でWindows PowerShellをもう一度起動します。
& : File C:\WINDOWS\system32\install-pyenv-win.ps1 cannot be loaded because running scripts is disabled on this         system. For more information, see about_Execution_Policies at https:/go.microsoft.com/fwlink/?LinkID=135170.            At line:1 char:173
+ ... n.ps1" -OutFile "./install-pyenv-win.ps1"; &"./install-pyenv-win.ps1"
+                                                 ~~~~~~~~~~~~~~~~~~~~~~~~~
    + CategoryInfo          : SecurityError: (:) [], PSSecurityException
    + FullyQualifiedErrorId : UnauthorizedAccess
以下のコマンドを打ちます。
PS C:\WINDOWS\system32> Set-ExecutionPolicy -ExecutionPolicy RemoteSigned -Scope LocalMachine同じような文言が出たら、yを入力します。
Execution Policy Change
The execution policy helps protect you from scripts that you do not trust. Changing the execution policy might expose
you to the security risks described in the about_Execution_Policies help topic at
https:/go.microsoft.com/fwlink/?LinkID=135170. Do you want to change the execution policy?
[Y] Yes  [A] Yes to All  [N] No  [L] No to All  [S] Suspend  [?] Help (default is "N"): y
そしたら、下記のコマンドが通るはずです。
PS C:\WINDOWS\system32> Invoke-WebRequest -UseBasicParsing -Uri "https://raw.githubusercontent.com/pyenv-win/pyenv-win/master/pyenv-win/install-pyenv-win.ps1" -OutFile "./install-pyenv-win.ps1"; &"./install-pyenv-win.ps1"下記のような表示になればOKです。
    Directory: C:\Users\<username>


Mode                 LastWriteTime         Length Name
----                 -------------         ------ ----
d-----        11/15/2023   9:22 PM                .pyenv
pyenv-win is successfully installed. You may need to close and reopen your terminal before using it.
一度、Windows PowerShellを閉じて、再度開きます。
下記のコマンドで、pyenv-winがインストールされ、パスも通っているか確認できます。
pyenv --version
# -> pyenv 3.1.1
pyenv-winでPythonのインストール
pyenvでPythonをインストールしておきます。
下記コマンドでインストール可能なPythonのバージョンが確認できます。
pyenv install --list今回は、3.10.11をインストールします。
pyenv install 3.10.11下記の出力が出れば、OKです。
:: [Info] ::  Mirror: https://www.python.org/ftp/python
:: [Downloading] ::  3.10.11 ...
:: [Downloading] ::  From https://www.python.org/ftp/python/3.10.11/python-3.10.11-amd64.exe
:: [Downloading] ::  To   C:\Users\<username>\.pyenv\pyenv-win\install_cache\python-3.10.11-amd64.exe
:: [Installing] ::  3.10.11 ...
:: [Info] :: completed! 3.10.11
globalで設定をしておきます。
pyenv global 3.10.11ここで、下記のコマンドを実行すると、現在アクティベートされている仮想環境を確認できます。
pyenv version
# -> 3.10.11 (set by C:\Users\<username>\.pyenv\pyenv-win\version)
Windows PowerShell等でPythonが使えるかどうかも試しておきましょう。
pythonと打って、下記が出ればOKです。
Python 3.10.11 (tags/v3.10.11:7d4cc5a, Apr  5 2023, 00:38:17) [MSC v.1929 64 bit (AMD64)] on win32
Type "help", "copyright", "credits" or "license" for more information.
>>>
Poetryのインストール・設定
次に、Poetryのインストールをしていきます。
Windows PowerShellで下記コマンドを実行します。こちらは管理者権限でなくても問題ありませんでした。
PS C:\WINDOWS\system32> (Invoke-WebRequest -Uri https://install.python-poetry.org -UseBasicParsing).Content | python -無事にインストールできたら、下記の出力が出ると思います。
Retrieving Poetry metadata

# Welcome to Poetry!

This will download and install the latest version of Poetry,
a dependency and package manager for Python.

It will add the `poetry` command to Poetry's bin directory, located at:

C:\Users\<username>\AppData\Roaming\Python\Scripts

You can uninstall at any time by executing this script with the --uninstall option,
and these changes will be reverted.

Installing Poetry (1.7.0)
Installing Poetry (1.7.0): Creating environment
Installing Poetry (1.7.0): Installing Poetry
Installing Poetry (1.7.0): Creating script
Installing Poetry (1.7.0): Done

Poetry (1.7.0) is installed now. Great!

To get started you need Poetry's bin directory (C:\Users\<username>\AppData\Roaming\Python\Scripts) in your `PATH`
environment variable.

Alternatively, you can call Poetry explicitly with `C:\Users\<username>\AppData\Roaming\Python\Scripts\poetry`.

You can test that everything is set up by executing:

`poetry --version`
環境変数のpathへ下記を追加します。
%APPDATA%\pypoetry\venv\Scripts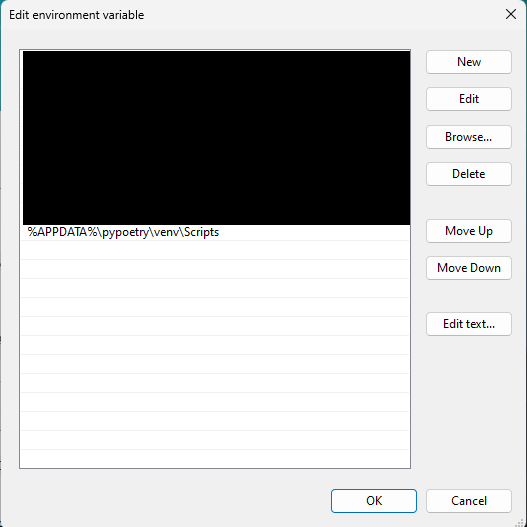
何かしらのターミナル(Windows PowerShellでなく、Command PromptでもGit Bashでも可)で、下記コマンドを実行し、Poetryがインストールされていてパスが通っているか確認します。
poetry --version
# Poetry (version 1.7.0)
ここまででPoetryのインストールまでは終わりです。
最後に、下記コマンドを実行して、プロジェクトごとに.venvディレクトリを作成し、仮想環境を作れるように設定しておきます。
poetry config virtualenvs.in-project truePoetryを使ってみる
venvで管理していなかった場合
では、Poetryでプロジェクトを作ってみましょう。
下記の poetry new コマンドを打つと、テンプレートから生成されます。
poetry new poetry-test # poetry-test はプロジェクト名です
# -> Created package poetry_test in poetry-test
また、下記のように --name を指定すると、ディレクトリ名を指定できます。
poetry new poetry-test --name prjnameこの場合、ディレクトリ構成は下記のようになります。
\---poetry-test
    |   pyproject.toml
    |   README.md
    |
    +---prjname
    |       __init__.py
    |
    \---tests
            __init__.py
ここで、.python-versionファイルを作成するために下記コマンドを実行しておきます。
pyenv local 3.10.11 # 3.10.11は今回インストールしたPythonのバージョン次に、 poetry add を使って、numpyをインストールしてみましょう。
cd poetry-test
poetry add numpy
すると、下記のような出力が出るはずです。
Creating virtualenv prjname in \<path-to-project>\poetry-test\.venv
Using version ^1.26.2 for numpy

Updating dependencies
Resolving dependencies... (0.1s)

Package operations: 1 install, 0 updates, 0 removals

  • Installing numpy (1.26.2)

Writing lock file
そして、下記ディレクトリとファイルが生成されます。
.venv (directory)
poetry.lock (file)
仮想環境をアクティベートしてみます。下記のコマンドを打ちます。
poetry shellすると、下記のようにアクティベートされます。(.venv\Scripts\activate.ps1と同じことをやっている認識です。)
(prjname-py3.10) PS \<path-to-project>\poetry-test>簡単なnumpyを使ったコードを実行するところまで行います。下記のpoetry-test.pyファイルを作成します。
import numpy as np

a = np.arange(0, 10, 1)
print(a)
作成したPythonファイルを実行して、下記の出力が出ればOKです。
(prjname-py3.10) PS \<path-to-project>\poetry-test> python .\prjname\poetry-test.py
# [0 1 2 3 4 5 6 7 8 9]
venvで管理していた場合
poetry new ではなく、 poetry init を使います。
poetry initこれを実行すると、下記のような出力が順番に返され、対話的にコンフィグを決めていくことができます。
基本的にはEnterを押していければ、 pyproject.toml が生成できます。
poetry.lock は生成されないですが、 poetry add をした際に生成されます。pipで仮想環境にインストールしていたものも、 poetry.lock に追記するためには、 poetry add が必要なようです。
This command will guide you through creating your pyproject.toml config.

Package name [venv_test]:
Version [0.1.0]:
Description []:
Author [xxxx <yyyy>, n to skip]:
License []:
Compatible Python versions [^3.10]:

Would you like to define your main dependencies interactively? (yes/no) [yes]
You can specify a package in the following forms:
  - A single name (requests): this will search for matches on PyPI
  - A name and a constraint (requests@^2.23.0)
  - A git url (git+https://github.com/python-poetry/poetry.git)
  - A git url with a revision (git+https://github.com/python-poetry/poetry.git#develop)
  - A file path (../my-package/my-package.whl)
  - A directory (../my-package/)
  - A url (https://example.com/packages/my-package-0.1.0.tar.gz)

Package to add or search for (leave blank to skip):

Would you like to define your development dependencies interactively? (yes/no) [yes]
Package to add or search for (leave blank to skip):

Generated file

[tool.poetry]
name = "venv_test"
version = "0.1.0"
description = ""
authors = ["xxxx <yyyy>"]
readme = "README.md"

[tool.poetry.dependencies]
python = "^3.10"


[build-system]
requires = ["poetry-core"]
build-backend = "poetry.core.masonry.api"


Do you confirm generation? (yes/no) [yes]
共通
poetryを使っている人同士で共有する際は pyproject.toml ファイルを共有して、 poetry install すれば良いと思いますが、pipで構築している人とパッケージを共有したい人もいるかと思います。
requirements.txt を生成するコマンドは下記です。
poetry export -f requirements.txt --output requirements.txtその他参考
Poetryのアンインストールは?
下記コマンドでアンインストールができます。
PS C:\WINDOWS\system32> (Invoke-WebRequest -Uri https://install.python-poetry.org -UseBasicParsing).Content | python - --uninstall
# -> Removing Poetry (1.7.0)
仮想環境から抜ける方法は?
下記コマンドで抜けられます。
deactivateおわりに
Windowsでpyenv-win, Poetryを使ってPythonの環境構築を行いました。
ずっと行いたかったので、できてよかったです。下記のサイトを大変参考にさせていただきました。
参考にさせていただいたサイト


コメント